I know what I want to be when I grow up. A professional baking-batter-eater. It may not be a thing yet, but I'll make darn sure it is by the time I'm a real adult.
I was going to call this future job of mine a cake-spoon licker but that seemed too restrictive. I would be missing out on all the cookie doughs and brownie batters of the world, and that just wouldn't do now, would it?
In an endeavor to make this future job as achievable as possible, I'm getting in as much practice as I can. That's where today's bake comes in. My-oh-my this batter is a good'un. It starts out pretty similar to a good staple cookie dough (feel free to put in a little practice and lick a spoon at this stage, my fellow budding batter-eaters). With the addition of buttermilk, cocoa powder and melted chocolate the mixture suddenly transforms into a delightfully soft and much thinner cake batter. After baking it produces richly flavoured and seriously moist cupcakes. Before baking it's a scrap-the-bowl clean kind of batter.
At this point I also feel the need to point out that "spoon-licker" is also too restrictive a title - I employed many utensils to make sure I got every last bit of this batter (don't pretend like you've never done that either).
Cupcake Ingredients:
75g dark chocolate, melted
50g butter
120g soft light brown sugar
1 large egg
120g plain flour
1.5tsp baking powder
pinch of salt
100ml buttermilk
4 heaped tsp cocoa powder
0.5tsp coffee granules
1tsp vanilla extract
Method:
Start by preheating the oven to fan 160 and lining a 12-hole cupcake tin.
Melt the chocolate either in the microwave or a bain-marie and set aside to cool.
In a large bowl beat together the butter, sugar and egg until evenly combined. Fold in the flour, baking powder and salt, being careful not to overmix. Carefully add the buttermilk and vanilla (it will splash if you beat too energetically, learn from my mistakes). Sift in the cocoa powder and fold in.
In a small bowl, whisk the coffee granules with just a splash of water to make them dissolve. Add this to the large mixing bowl in mix a few times to incorporate.
Divide the batter evenly between the cupcake liners (leaving sufficient for good taste test). Bake for 20 minutes until well risen and springy to touch.
Remove from the tin and leave to cool on a wire rack.
I cut out the middle of these beauts and filled them with a really tasty and much healthier yogurt truffle mix. They were then topped off with the remaining of the truffle mixed with salted caramel. Yum.
Filling and Icing Ingredients:
150g chocolate, dark or milk - whatever your preference
150ml natural yogurt
caramel sauce
fleur de sel (or any other rock salt)
Method:
Melt the chocolate either in a bain marie or a microwave. Whisk in the yogurt and stir until fully combined.
Allow this mixture to cool in the fridge for about ten minutes to firm up slightly.
Meanwhile, cut the middle out of each cupcake, making sure not to cut all the way to bottom. (Feel free to eat the middles - chef's perks).
Fill each of the holes with the light and tangy truffle mix. You will probably need just under half of the mixture.
With the remainder, mix in some of the caramel sauce. I'll admit, I was lazy and used store bought but Waitrose's caramel sauce is gooooood. I mean, sneak a spoon in whenever no one else is around kind of good. Add as much or as little of this as you like. I mixed in about 2 tbsp.
Swirl this all over the top of each cupcake.
Then drizzle with more caramel sauce and sprinkle on your sea salt. Now eat...lots.
On Wednesday it was my birthday and, yes, I made my own cake. It was one of the highlights of my day. I'm that much of baking nerd (is there even such thing as baking nerds?)
This year I decided on a chocolate malt cake. I love maltesers, they are by far my favourite chocolate, so I decided to try and replicate the flavour in cake form. I went all out and threw a hefty helping of malt powder into both the cake and the buttercream icing.
I asked for a new camera for my birthday since I've been having to borrow my brother's to take photos for this blog. It's a Panasonic Lumix DMC-TZ30EB-K and whilst I'm only just getting to grips with it and learning how to use it properly, I'm already in love with it.
Back to the cake;
Cake Ingredients:
250ml buttermilk
60ml sunflower oil
2 large eggs
1tsp vanilla extract
220g self-raising flour
100g caster sugar
150g soft light brown sugar
95g cocoa powder
1tsp baking powder
3tbsp malt powder (I used horlicks)
100ml freshly brewed coffee
Method:
Preheat the oven to fan 160 and grease and line 2 9-inch cake tins.
Whisk together the buttermilk, oil, eggs and vanilla in a large mixing bowl.
Sift together the flour, sugars, cocoa, baking powder and malt powder until lump-free.
Slowly add the dry ingredients to the wet and mix until everything is evenly combined.
Pour in the coffee and mix again. It will be a very wet batter but don't panic, it's meant to be.
Divide between the two tins and bake for between 20 and 30 minutes, until the edges are just beginning to shrink away from the tin and the top springs back when touched, but the cakes are still moist and fudgy.
Leave to cool in the tins for 10 minutes before removing and cooling completely on a wire rack.
Buttercream ingredients:
250g butter
500g icing sugar
5tbsp malt powder
2tbsp cocoa powder
100g dark chocolate, melted
Method:
Cut the butter into smallish chunks and drop into a food processor. Blitz for about 30 seconds until well softened.
Add the icing sugar, cocoa powder and malt powder in batches of roughly thirds, blitzing each time until fully incorporated.
Lastly, pour in the melted chocolate and blend again.
At this point, the buttercream will be quite soft so you might want to put it in the fridge for 20 minutes to firm up a little before spreading on the cake.
Once the cakes are completely cool, it's time to ice. Place one of the cake layers on your serving plate and spread about one third of the icing on top, going all the way to the edges. Put the other cake layer on top and spread another third of the icing on that. Use the last third of the icing to cover the sides.
If at any point your icing is getting too soft, bung both the cake and icing in the fridge for 10 minutes to firm up a little. It might also help to build the icing up in thinner layers, rather than spreading it all on at once.
For the chocolate shards around the edge, I followed these instructions.
These are by no means delicate or beautiful. They don't photograph tidily, and you can't eat them neatly.
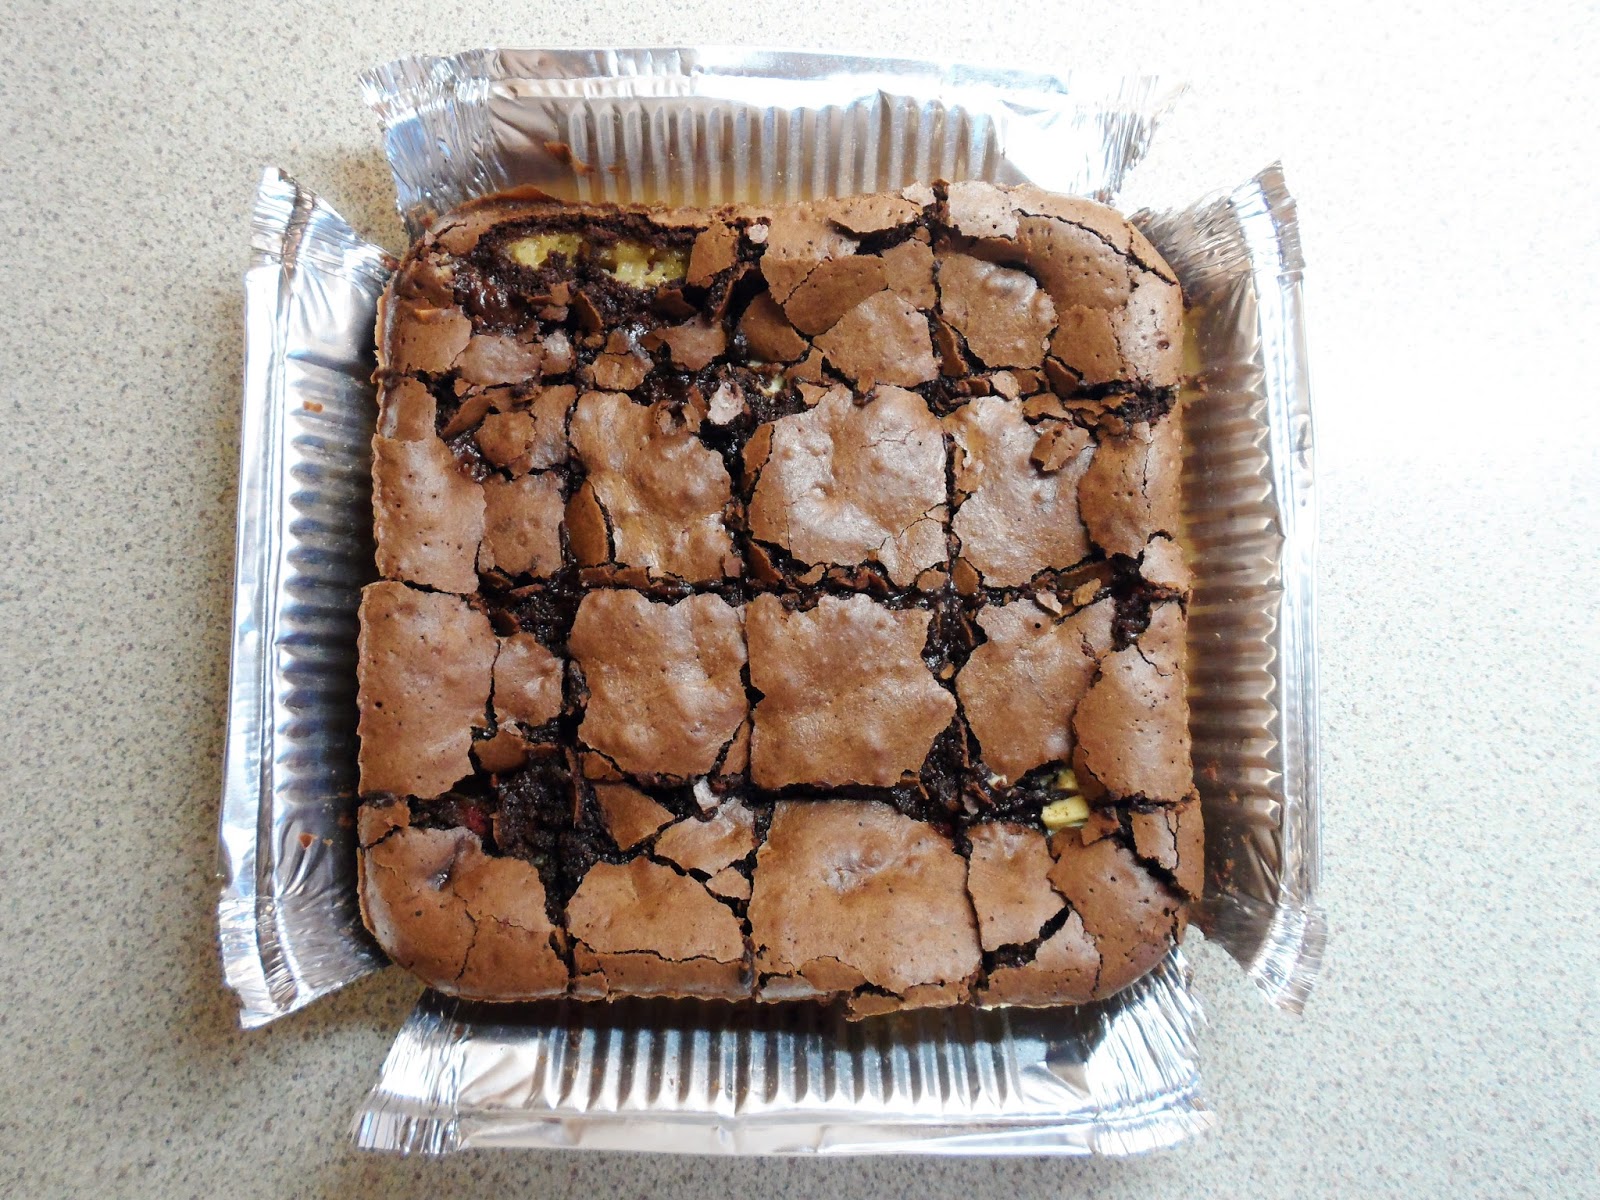
You can however eat them slowly, savoring the chewy, dense texture, the intense chocolate flavour of the brownie top, the tangy raspberries hidden in the middle, and the caramelly flavour of the blondie bottom. You can let the white chocolate chunks slowly melt in your mouth...or you can shovel three down in a matter of minutes. Whatever floats your boat.
These started off as a rather simple but still pleasantly tasty treat - white chocolate and raspberry blondies. We had a whole box of raspberries sitting in the fridge that were just too soft to eat on their own, or as more often occurs in my house, at the side of chocolate cake. So baking with raspberries was in order. When I'd whipped up the blondie batter and studded it with the bright red berries, the offering looked a little shallow in the tin and just a bit underwhelming.

My brain set to work and my first thought was, well double the blondie recipe and have a secret raspberry layer in the middle. That was all well and good until I realised I didn't have enough brown sugar. Back to the drawing board. Suddenly I was hit with a wave of inspiration and thought to myself "mwhahaha I'm an evil baking genius" (just a little insight of what goes on in my head) - what would work just as well, if not better, than blondies? Brownies! And so my somewhat traditional treat turned into something new, layered and delightful. Give it a go, you'll love them.
Blondie Layer:
115g butter, melted
100g brown sugar
100g caster sugar
1 egg
1tsp vanilla extract
125g plain flour
1tsp baking powder
100g white chocolate, chunked
Method:
Preheat the oven to fan 160.
Beat together the melted butter and two sugars in a large mixing bowl until all combined and smooth. Crack in the egg and splosh in the vanilla and mix again. Carefully fold in the flour and baking powder until you have an even batter. Mix in the white chocolate chunks and pour into a greased 9x9 inch pan.
Dot raspberries all over the top of the blondie layer until it is mostly covered and you just see peeks of blondie batter coming through (I used roughly 175g raspberries).
Brownie Layer:
100g dark chocolate
100g butter
45g plain flour
20g cocoa powder
2 eggs
140g caster sugar
100g white chocolate, chunked
Method:
Melt the chocolate and butter together in a bain marie.
Whilst the chocolate is melting, whisk the eggs and sugar together with an electric whisk until doubled in volume and moussey. When the beaters are lifted they should leave a small trail that sits on the top of the mixture for a few seconds.
Fold the melted chocolate and butter into the moussey egg-sugar mixture, using either a spatula or a metal spoon, and going gently so you don't knock all the air out that was just whipped in.
Sift in the flour and cocoa powder, and again fold gently.
Add the white chocolate chunks then pour over the raspberry-studded blondie batter.
Bake for about 40 minutes, until there is a slightly crisp top to the brownies but a slight wobble underneath. You might need to cover the top with foil after about 20 minutes to avoid the top burning, so keep an eye on them. Leave to cool in the tin then slice in 16 pieces.
Light and fluffy vanilla cake. Billowy, softly whipped cream. Sweet strawberry slices. And it's seriously easy too. What more could you want on a beautifully sunny summer day?
Victoria sponge is a classic British cake. And everybody loves cupcakes, right? So I did a little twist on both and made cupcake-y mini victoria sponges.
These are so easy to whip up. Less than ten minutes work to make the little cakes. They play by the 2-4 rule of baking; 2 eggs and 4oz of sugar, butter and flour.
Ingredients:
100g/4oz butter
100g/4oz caster sugar
2 eggs
1tsp vanilla extract
100g/4oz self-raising flour
1tsp baking powder
.
Method:
Preheat the oven to fan 160 and line a baking tray with 12 cupcake liners.
Cream together the butter and sugar until pale and fluffy.
Add the eggs, one at a time, and beat well after each addition. Mix in the vanilla extract with the second egg.
Fold in the flour and baking powder until everything is fully combined.
Divide the batter between the cases and bake for 12-15 minutes until lightly golden and the tops spring back.
Leave to cool on the tray for a few minutes before transferring to a wire rack.
Filling:
Once the cupcakes are cool, cut them in half horizontally.
Softly whip 150ml double cream until it is billowy and just holds it's shape, not stiff and dry.
Spoon a little cream onto the bottom half of each cake.
Top the cream with some sliced strawberries.
Replace the top half of the cupcake and you're done. A tasty twist on a classic.
Also, since they're mini, you're totally to go back for seconds...or thirds (no one will tell)